
Introduction
This lab explores the basics of polygon modeling in Maya by making a simple toilet prop. The lab gives detailed step-by-step instructions, but feel free to follow them as closely or loosely as you want. However, pay close attention to all of the different tools that are used, as the Modeling 2 lab will build off of them.
Modeling the Bowl
Warning
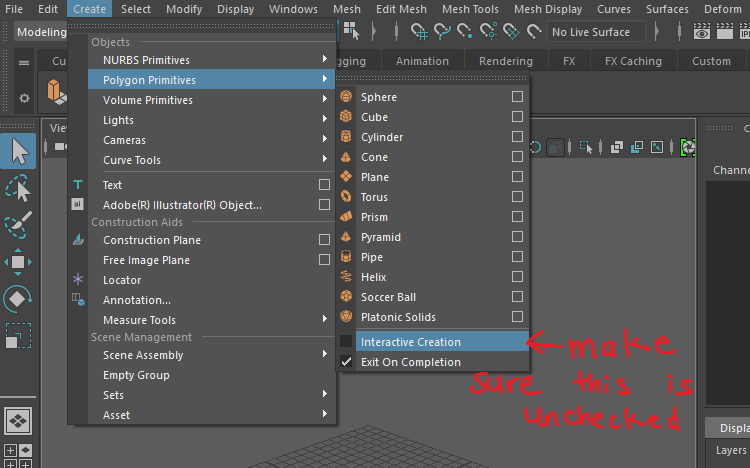
First, let’s make sure that interactive creation is turned off. From the menu at the top, go to Create → Polygon Primitives. Click the Interactive Creation entry on the menu to uncheck the box (if it is not already unchecked somehow). Now go ahead and create a cylinder: Create → Polygon Primitives → Cylinder.
Before we go any further. Let’s get in the good habit of naming our objects. If you go open your outliner under Window → Outliner, you will see pCylinder1. If you double click the text pCylinder1, you can rename it. Let’s name it bowl.
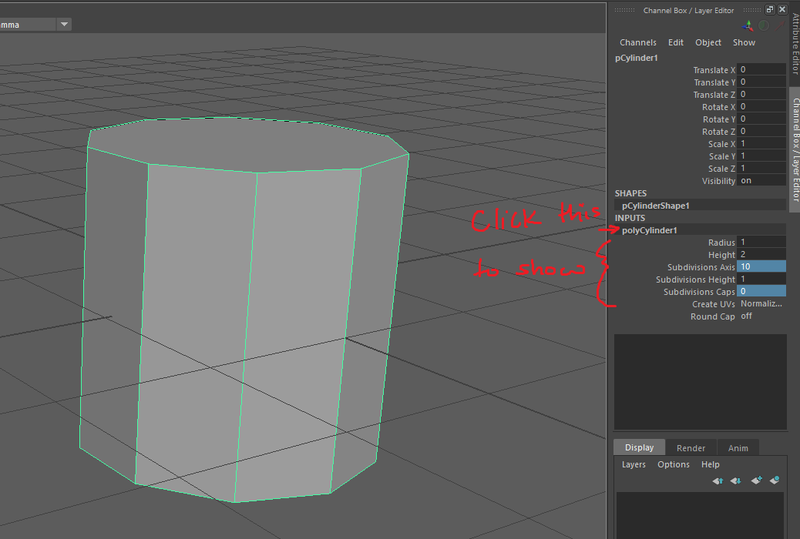
Now change the cylinder options under INPUTS in the Channel Box. To show the channel box, click the right most button in the upper right corner of the window.
Under where it says INPUTS, there should be some text that says polyCylinder1. Clicking on that will reveal a few different properties like Radius and Height with different values that you can change. Go ahead and change Subdivisions Axis to 10, and change Subdivisions Caps to 0. Your cylinder should change to look like the one below.
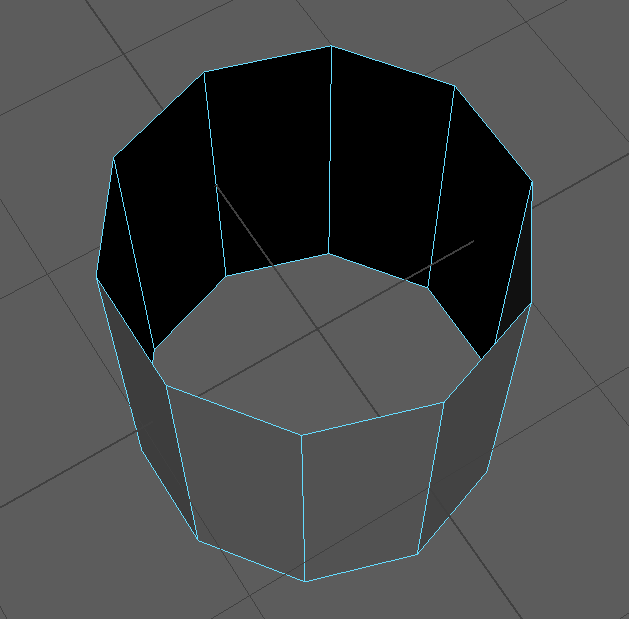
Switch to Face Mode by moving the mouse cursor over the cylinder, and holding down the right mouse button Right 🖱️. When the menu pops up, drag the mouse cursor over Face and release the right mouse button.
Now that you are in face mode, you can select (Left 🖱️) and delete the caps on the top and bottom by pressing ⟵ Backspace on the keyboard.
Then, use the right-click menu and select Object. This goes back out into object mode. Select the cylinder (should highlight green) and switch to the scale tool (last button in the toolbox, or R on the keyboard.) Drag the y-axis (vertical) arrow downwards to make the cylinder thinner. Then scale the cylinder in the z-axis to stretch it lengthwise, like in the picture below. This gives our cylinder a more ovular shape which is closer to a toilet bowl.
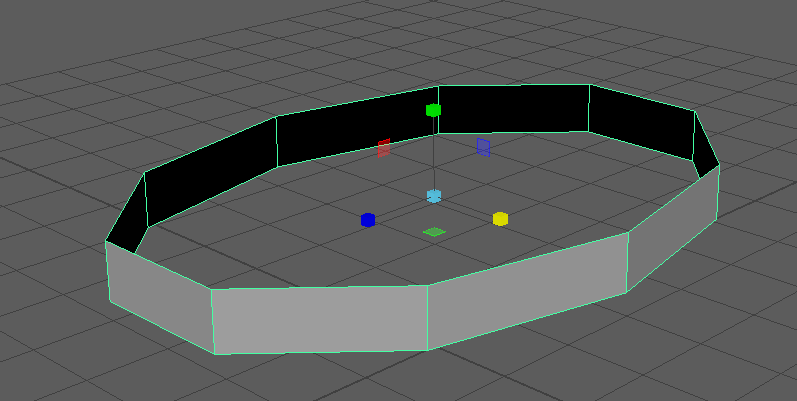
Since we are modeling a toilet bowl, we want the back of the bowl to be flatter rather than angled like it is now. However, before we make any further changes to our bowl, we want to remember to keep the object’s symmetry. After all, we expect toilets in real life to be symmetrical so our model should most likely be symmetrical as well. In newer versions of Maya, rather than selecting edges/vertices/faces manually, there is an option to turn on symmetry while modeling an object.
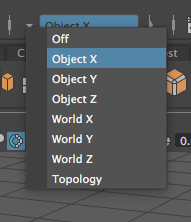
Look at the row of buttons above the shelf. To the far right of the dropdown menu you’ll see another dropdown option with the words Symmetry: Off written (this makes sense since our symmetry is currently off).

Click on the small arrow to the left of this box to open the different symmetry options you can use with this tool. For now, we are going to turn on Object X symmetry.
With your symmetry tool now on, hover back to the viewport and use the right-click menu again to go into Edge Mode. Now when you use the select tool to select the left or right edge on the back of the cylinder, both edges will be selected. (like in the image below).
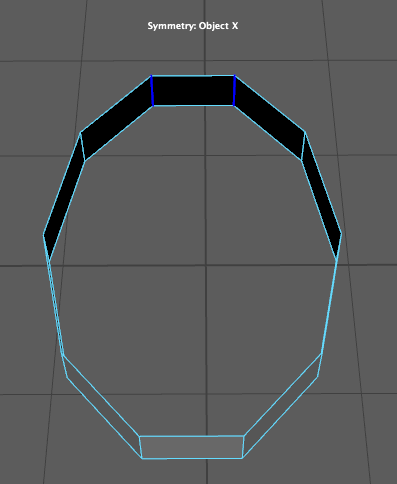
Then use the move tool and move those edges along the x-axis (red arrow) so that the bowl is slightly flatter and wider in the back.
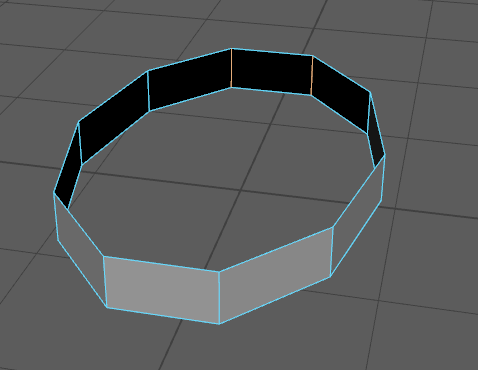
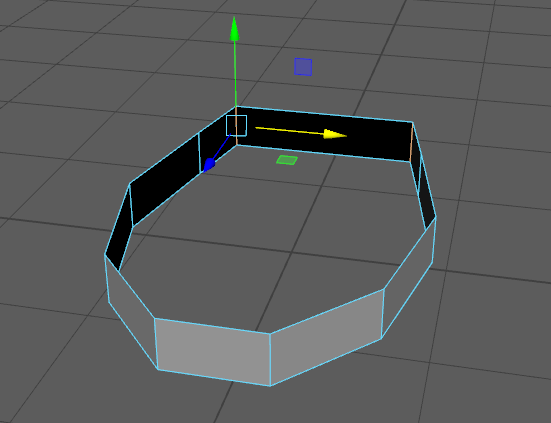
In the past students have been somewhat confused at this step so just to clarify, here is a comparison image of what the bowl should look like before and after you’ve completed this step.
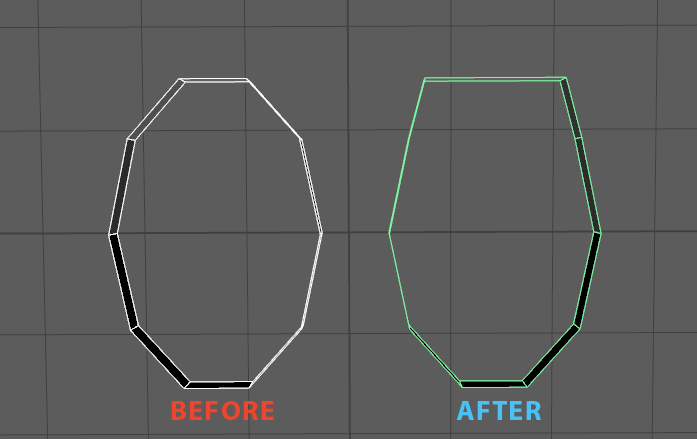
By using the symmetry tool and selecting the edges on back of the bowl, we were able to maintain the bowl’s symmetry. We could have made similar changes by selecting each edge individually and using the move tool, but then we might have had to spend more time adjusting each side to make it look right.
At this point you can turn your symmetry back off, however, for the rest of this lab remember that tool is easily at your disposal. Don’t hesitate to use it!
Extrude
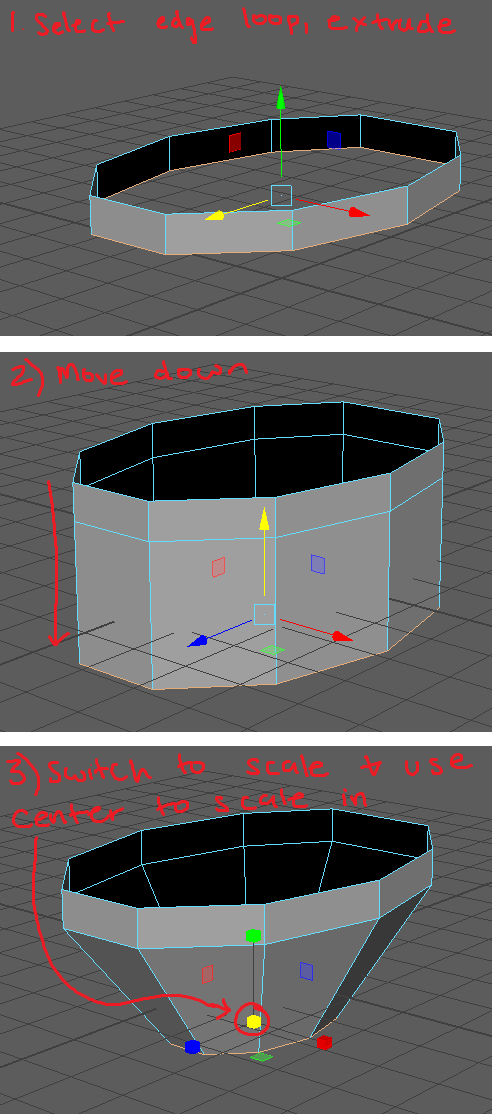
Now, while still in Edge Mode, we can double-click on one of the bottom horizontal edges to select the whole bottom ring. We want to extrude the bottom ring downwards to make the bowl deeper:
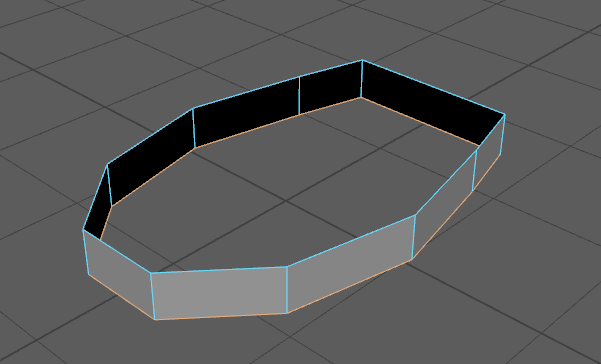
Go to Edit Mesh → Extrude or use the hotkey ⎈ Ctrl E.
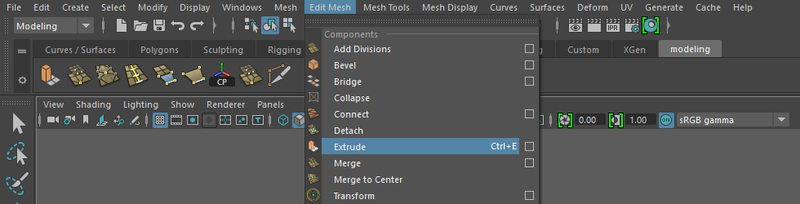
This will give you a weird circular manipulator in the viewport. This manipulator doesn’t always behave in an intuitive way so many people switch immediately to another tool (in this case, use the move tool W). Then move the selected edges down.
Note
In newer versions of Maya, there are many shortcuts to extruding. For example, you can perform the same action by selecting the bottom ring of edges and pressing ⎈ Ctrl E to extrude. An even shorter method is to select the edges, go back to the move tool, and press ⇧ Shift while hovering over one of the arrows. You will see the words
Extrudeshow up near the arrow indicating that you can extrude the edge in that direction. Feel free to choose any of these three methods to extrude from this point forward.
An Important Note on Extruding
The point of extrusion is to create a new set of edges/faces/vertices/ on top of the old ones that were selected. Therefore, always make sure to move whatever you are extruding; if you extrude edges or faces and you do not move them, they will remain in the same place as the original edges or faces. That means you will only see one set of polygons when there are actually two. If you extrude and forget that you have done so, it can lead to poor topology and can cause problems later on. Sometimes it’s a little tricky to fix, so be careful!
The best way to check if you have already extruded a piece of geometry is to select the relevant faces or edges, and use the move tool to shift them aside temporarily in order to “peek” behind them. If you move a face/edge and there’s an identical one right where the one you moved was, you already extruded that region. The best solution is usually to press undo, but that only really works if you extruded recently. Otherwise, you’ll have to select all the vertices of the faces that have been extruded accidentally, and use the Edit Mesh → Merge tool (click the option box and choose a low threshold). If you’re having trouble, be sure to ask a facilitator for help and/or clarification!
If you wish to undo an extrusion, it is extremely important to press undo until you see the UNDO: PolyExtrude message below your viewport. Sometimes that will mean pressing undo twice; always be sure to check that you have properly undone an extrusion to avoid duplicate face/edges!
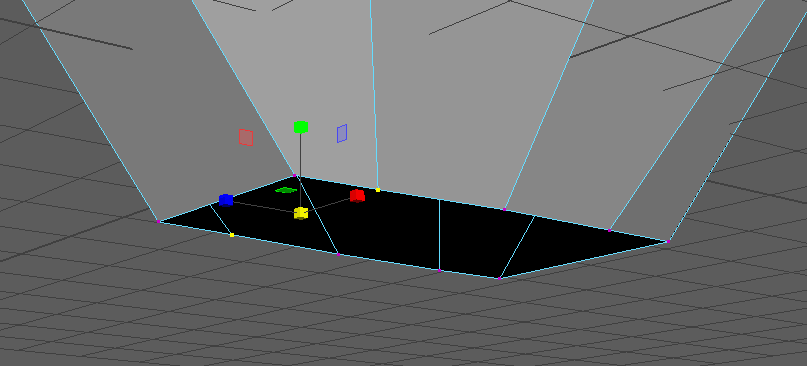
Once you have extruded and scaled in the bottom edge, go into vertex-mode and tweak the bottom points to get a more rectangular base that many toilets tend to have. Remember at a step like this, the symmetry tool would be immensely helpful!
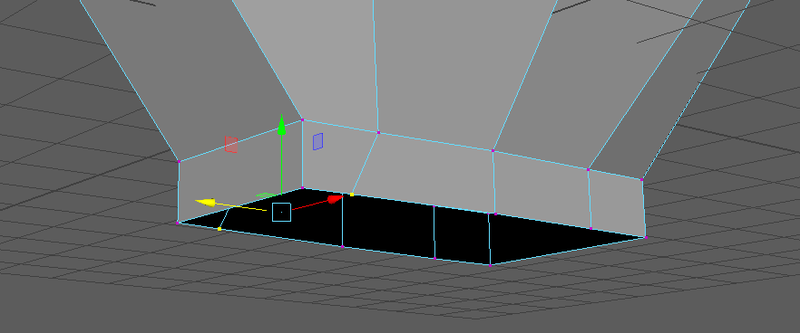
After adjusting the vertices, go to edge mode, double-click the bottom edge to once again select the entire ring of edges, extrude the bottom edge down, and then tweak the verts on that ring.
Insert Edge Loop
Next we want to give it some bowl shape. This means we must add another edge loop in the middle of the tapering portion. So with our mesh in edge mode, go to Mesh Tools → Insert Edge Loop.
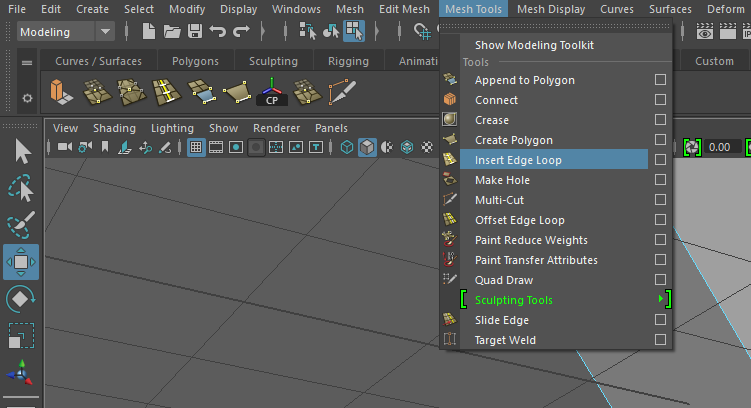
Pick one of the vertical edges on the bowl and Left 🖱️ Drag. When you let go, the loop should get added. Since that loop is already selected, you can just scale those edges out to get a more bowl-ish shape.
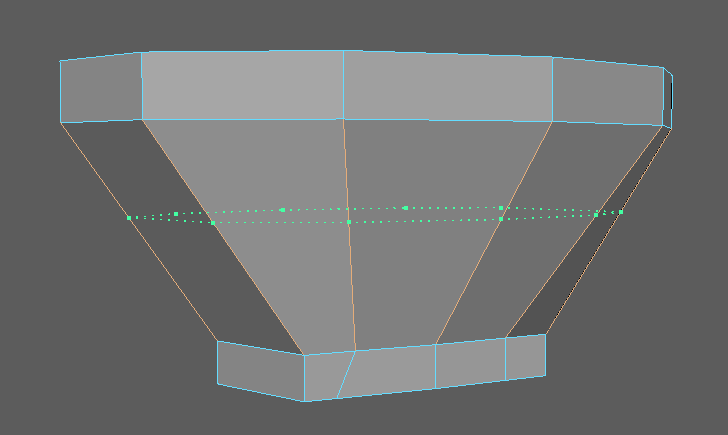
Then we’ll want to add another loop to be the bottom of the bowl (where the bowl meets the rectangular part of the toilet). Adjust the new loop to be more-or-less flat with the base.
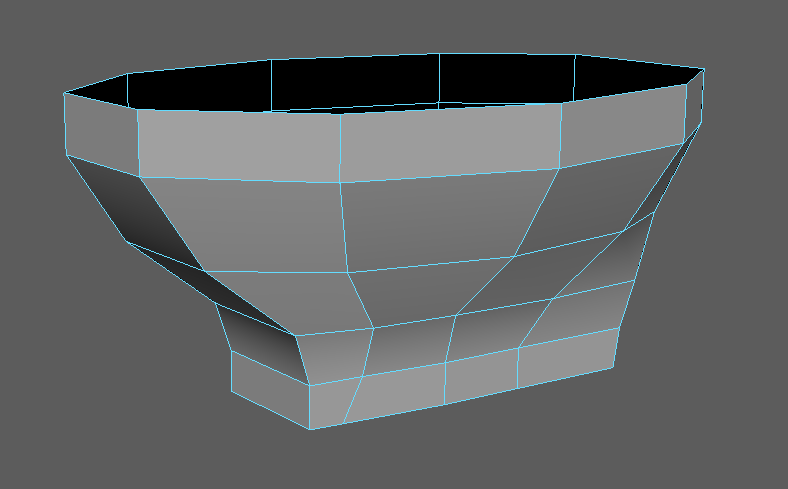
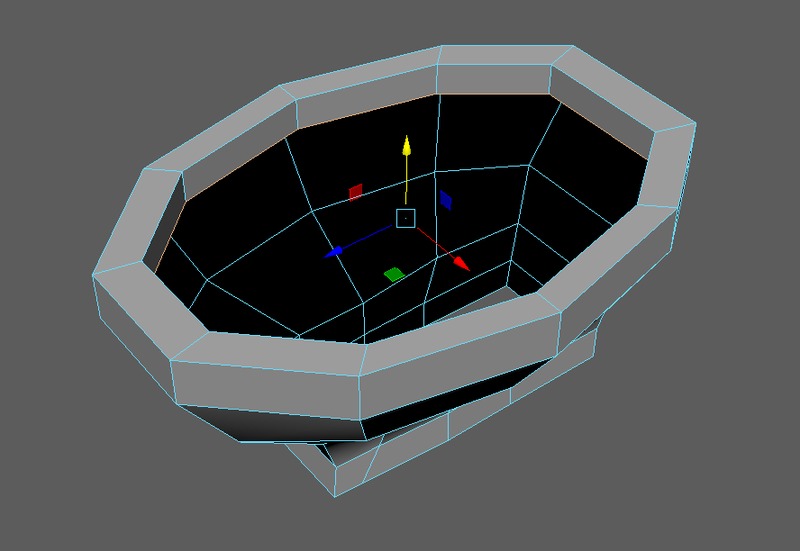
At the top now, let’s give the lip some thickness. Select the lip and extrude, switch to the scale tool and scale in. Then extrude again, switch to move tool, and move down.
Smooth Preview
So far, we’ve had a very sharp/polygonised, cg-looking toilet. Usually they are smooth. Maya has a smooth-preview feature that will show you a catmull-clark subdivided version of the mesh. This means it’ll be much smoother. Hit 3 to switch into smooth-preview mode. Hit 2 to switch into smooth-preview with non-smooth cage. Hit 1 to switch back out of smooth-preview into hard mode.
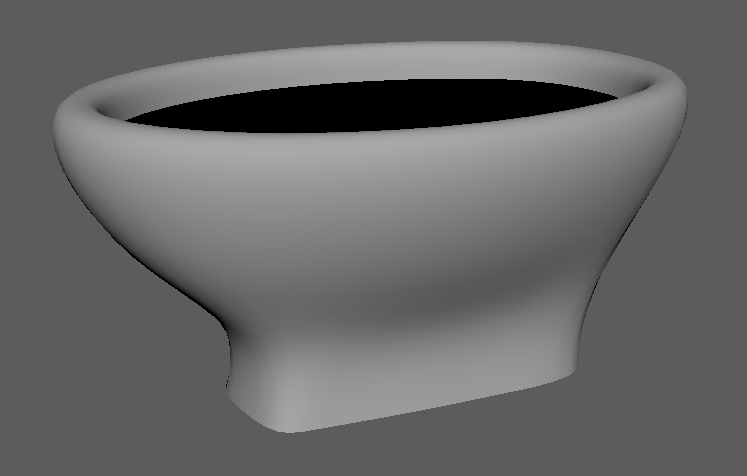
You’ll notice that our smooth-preview removes some of the desired sharper corners. The technique to fixing this involves inserting edge loops close to where you want sharp edges. Whenever two loops are close together, they make a sharper corner. Let’s add edge loops to sharpen corners near the top of the bowl, near the top inside the bowl, and near the bottom of the bowl. This should give us a fairly smooth bowl with sharper corners when smoothed.
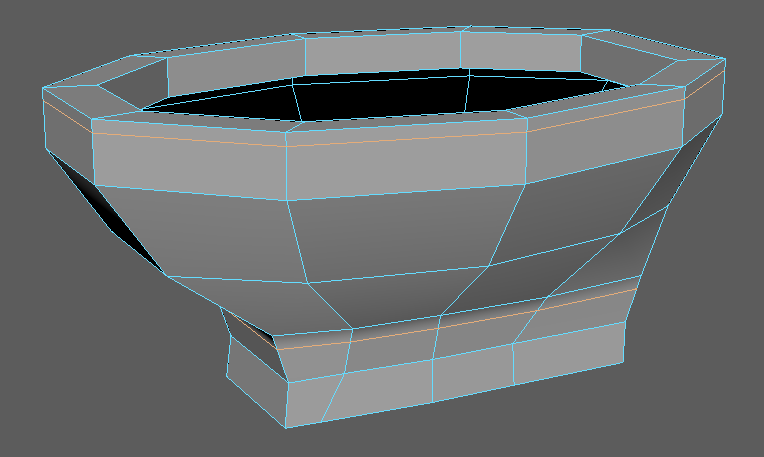
Note
It’s important to remember that pressing 3 to see your object in smooth mode represents a preview of your object and not the actual shape of your object. The real shape and form of your mesh is what you see when you press 1. Therefore, you usually don’t want the hard surface mode to be too drastically different from the smooth preview mode. (The reason why can be a bit difficult to explain but just remember that this is good modeling practice)
More Extrusion
Now, moving on, we are going to add the rear portion of the toilet. This requires extruding faces, so select the faces on the back part of the toilet and extrude further back.
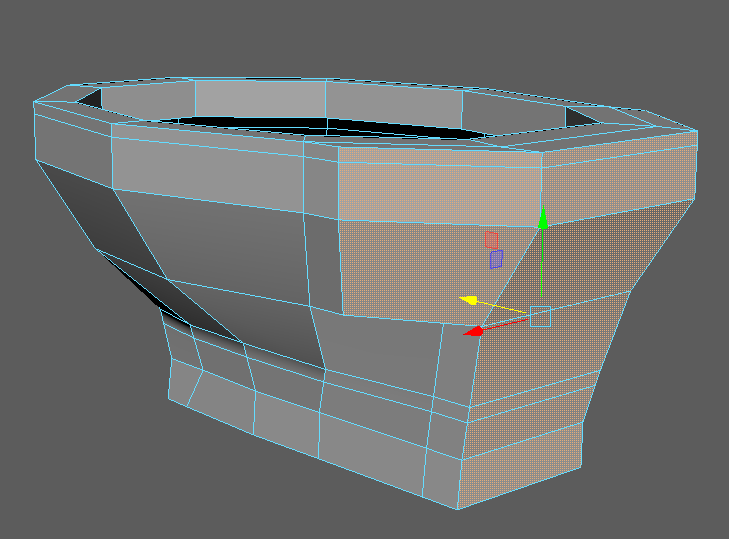
Flatten out the back using the scale tool to scale down along z (a nifty trick for flattening things). Hold down J before scaling and it will help flatten the surface quickly.
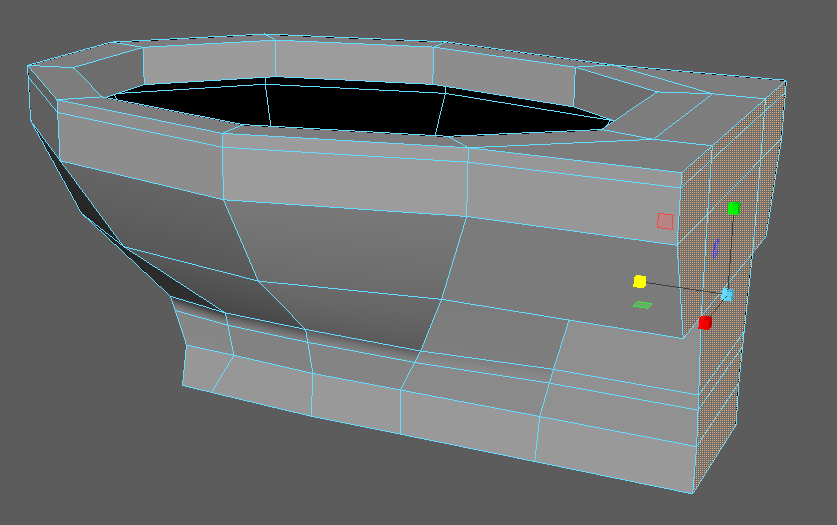
Extrude back once more and then tweak the shape to be however you want the back of your toilet to look. Remember that reference images are great for this purpose!
Modeling the Tank
Our next step is to make the tank on the back. We’ll start with a cube: Create another cube and put it into position. Then in the channel box again under polyCube#, change the subdivisions all to 3. This gives us enough subdivisions to have sharper corners (if we smooth now, it will be too round).
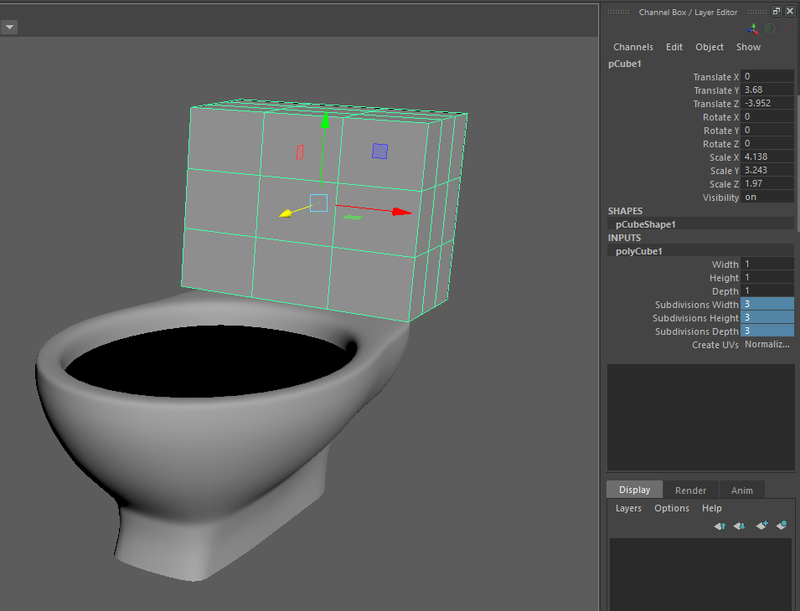
Now tweak the shape of the tank. Remember, putting edge loops close together will create a sharper corner on the smoothed mesh.
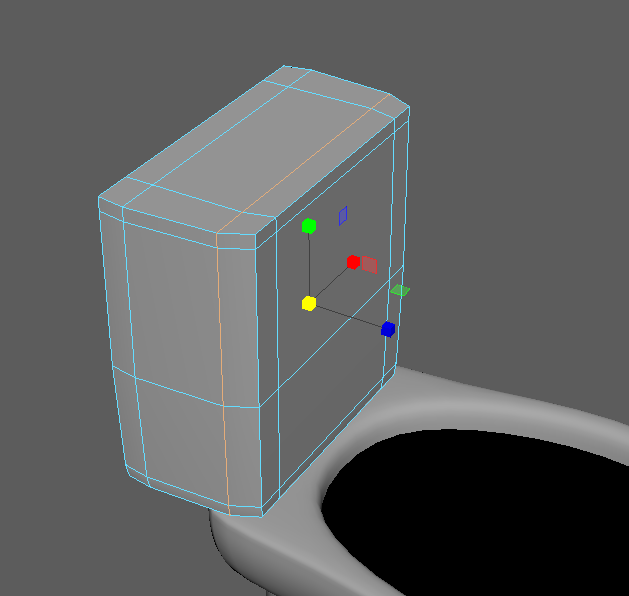
Duplicate Face
The tank needs a lid. So, instead of creating a new cube and trying to get it to look like the current tank shape, we can just duplicate the top face of the tank.
Select only the top faces of the tank and go to Edit Mesh. Under the section titled Face you should see Duplicate.
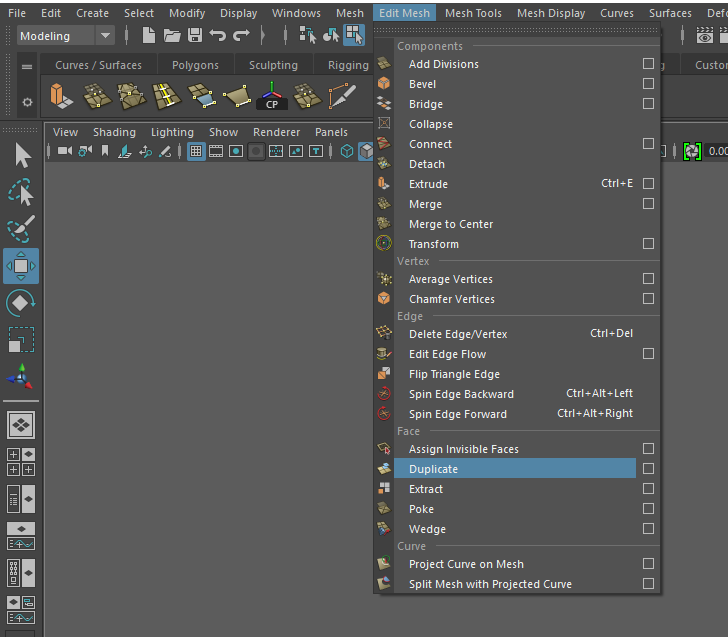
The new object is now highlighted in green. Like Extrude, Duplicate Face uses a weird manipulator, so switch to the Move tool again and left click Left 🖱️ on the new object to select it. Move it up a bit and scale it to make it sit nicely on top of the original tank.
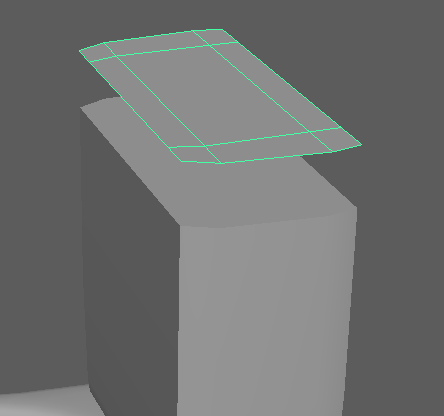
Move back to face mode and select only the top faces; extrude the faces upwards to make the tank’s lid shape. Notice, if you try to extrude downwards, the faces will all be black. This means the normals are facing the wrong direction. We’ll talk more about normals later but for now, make sure all faces that are facing outwards are gray, not black.
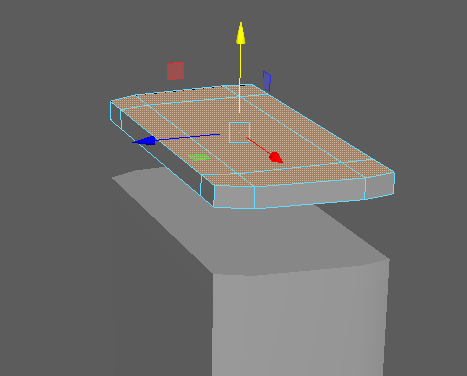
You may notice, after you return to object mode, that your pivot is no longer centered on the object. You can recenter it by going to Modify → Center Pivot.
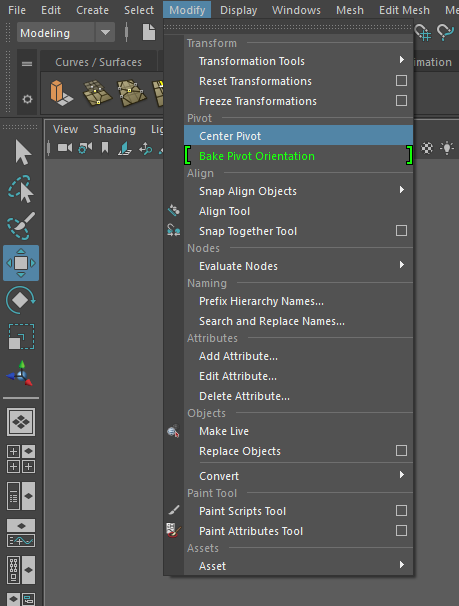
There is also a convenient shortcut button for Center Pivot on your shelf under Poly Modeling.

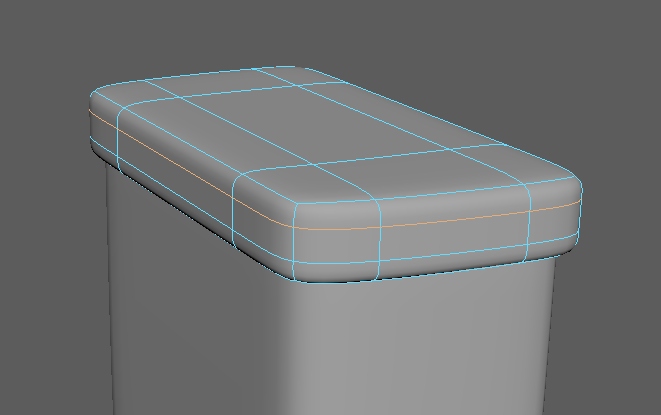
To make the lid fit over the tank, scale it out a little more. Also, sharpen the top and bottom of the lid a little by adding some more loops.
Modeling the Seat and the Lid
On to the toilet seat and lid!
We’ll use the same duplicate faces trick we used on the tank to duplicate the top faces of the bowl’s shape. Once those faces are separated, we have the start of our seat, however we will need a duplicate of this object for the lid. Select the new object and press ⎈ Ctrl D to duplicate the entire object; move the second duplicate a little higher since the lid will go on top of the seat. Go ahead and name the lower object Seat and the top object Lid in the outliner.
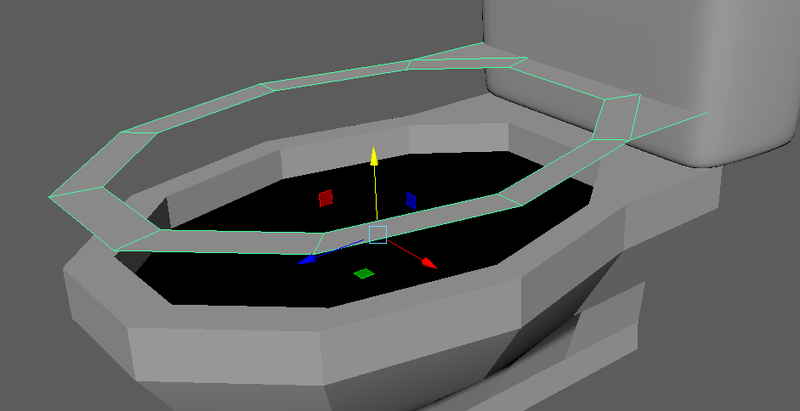
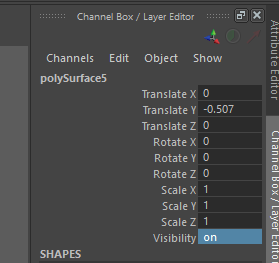
I hid the second duplicate (lid) temporarily to work on the seat (that’s up to you). You can hide something by selecting it and turning the visibility off in the channel box. Just click on the box to the right of Visibility and type on or off depending on which you want to do. You can also select an object and press H as a shortcut.
You can turn it back on later by selecting it from the outliner (this is one of the reasons it is important to name your objects) and turning visibility back on, or by pressing H again.
To finish up the seat, scale the inner loop more inwards (so that the seat isn’t too large for someone to realistically sit on) and then extrude the whole shape downwards. Add a loop near the bottom for a sharper edge. Then add some loops on the top and move them up to get a rounder shaped top (more comfy for your butt). Then tweak to your liking (maybe scale it up so it slightly overhangs the bowl or something).
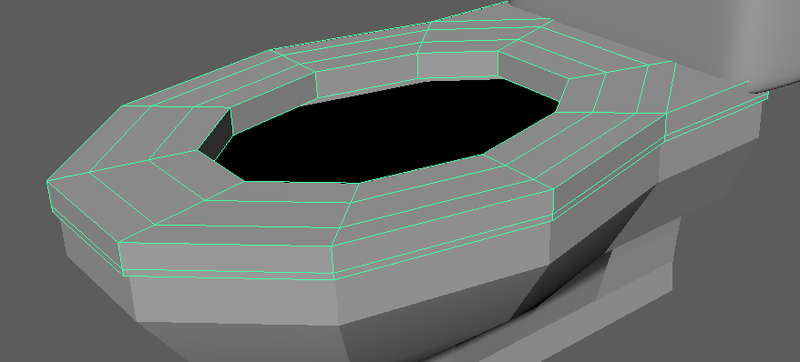
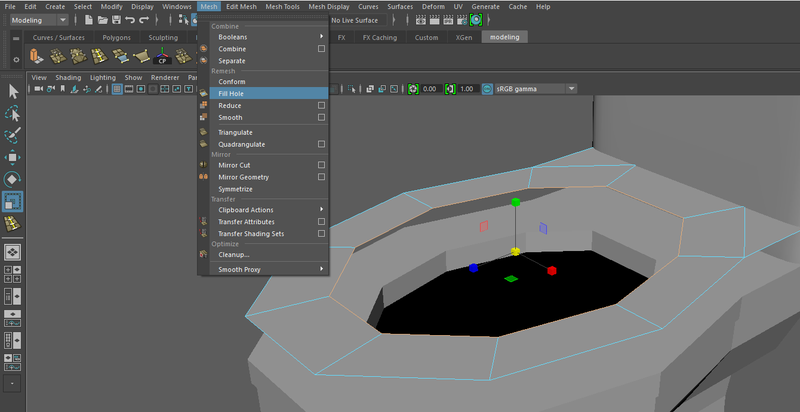
Now, select the lid (unhide it if its hidden) and enter edge mode. Then select the inner edge-loop and shrink it inward a bit. A toilet lid usually doesn’t have a big hole in the middle, so we need to fill that hole. Fill the hole by selecting the entire innermost edge and going to Mesh → Fill Hole.
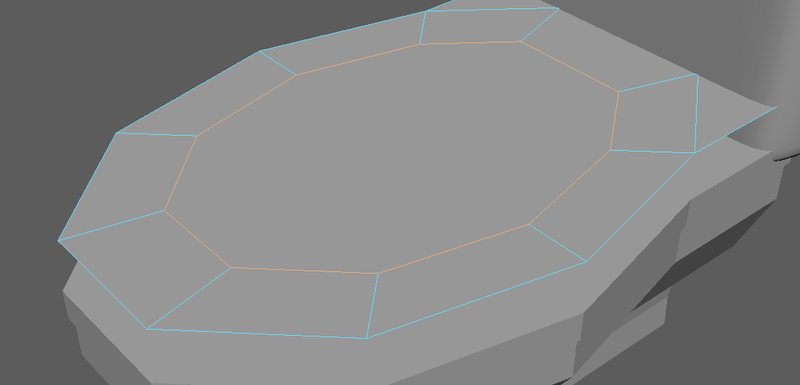
Your lid object should now look something like this:
Multi-cut Tool
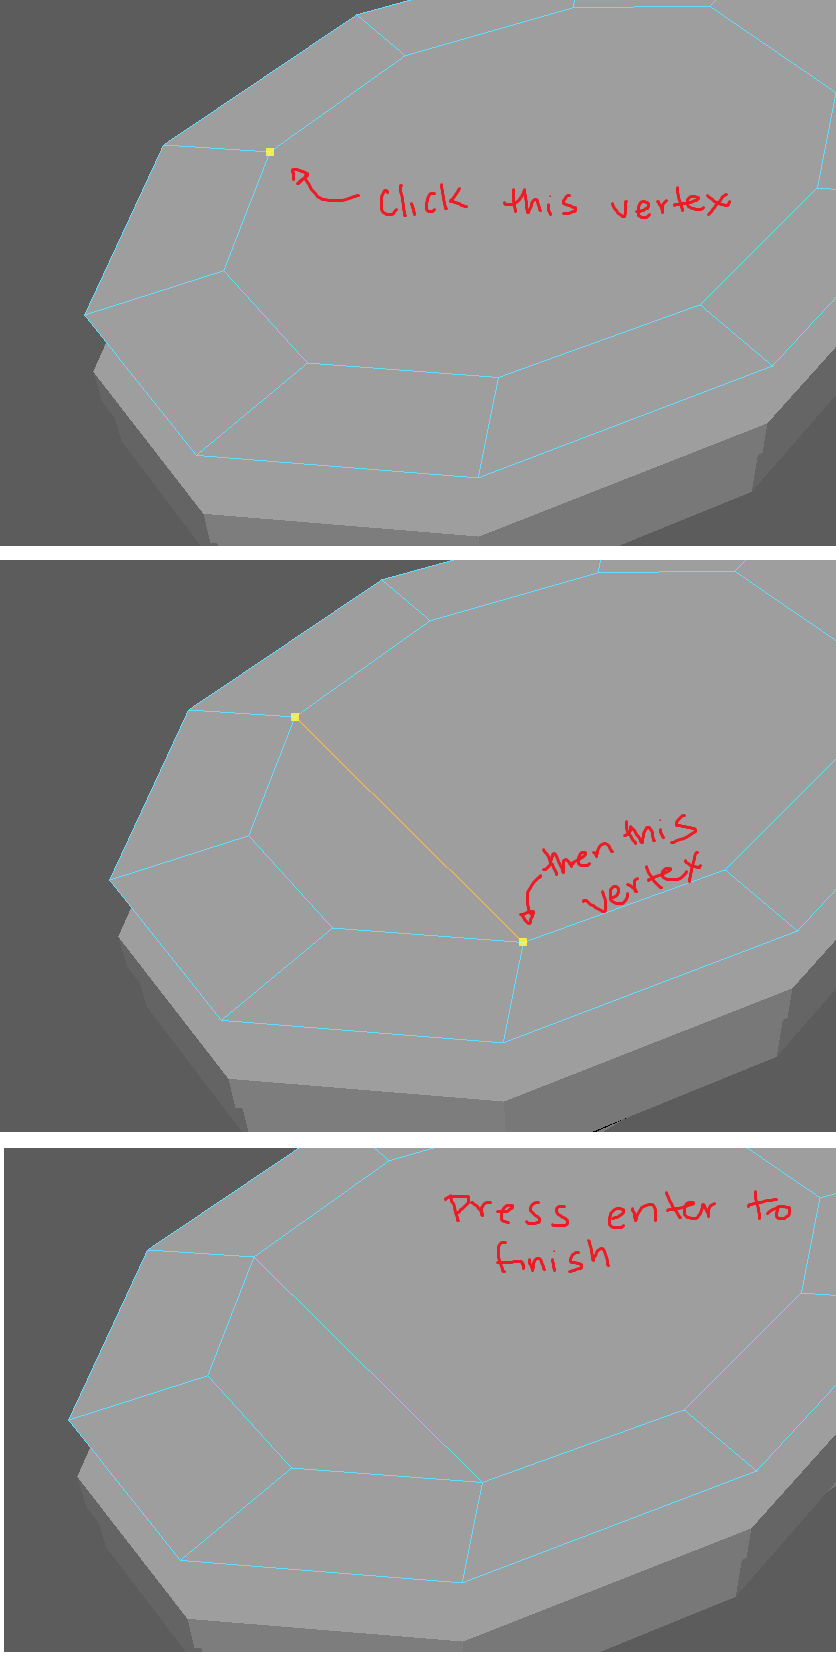
You’ll notice that it has filled the hole with a 10-sided face. Usually we avoid faces with this many sides because smoothing a face like this behaves unpredictably. So, let’s turn that face into 4 quads (Quads meaning quadrilaterals). We’ll use the Multi-Cut tool for this. Go to Mesh Tools → Multi-Cut.
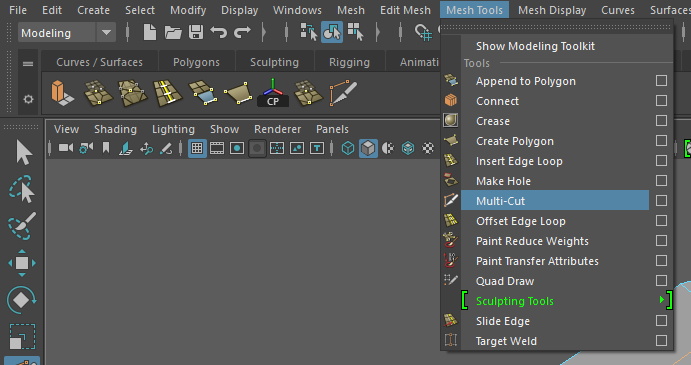
This tool is a little weird; here’s how it works: First, left click Left 🖱️ on a vertex to start a new edge, then mouse over to the opposing vertex and left click again. You can then right click Right 🖱️ to complete that edge. You can then left click on the next vertex, and do the same thing. Once you have create 3 new edges, make sure to exit the tool by pressing ⏎ Enter.
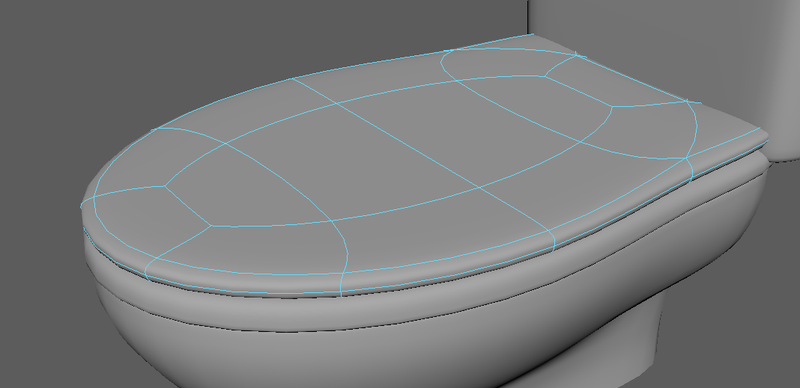
Do the same things we did to make the seat and tweak it until it looks right.
Our toilet is almost complete. Remember from our project management lecture, however, that we want to make sure every asset in our project is clean and clear. Let’s get into that good habit by doing some things before we leave:
First, our toilet is still in separate pieces. Once you are done and plan on using the toilet as an asset (no pun intended), it is recommended to combine them into one mesh or to group all the pieces. You can combine mesh pieces by selecting them and going to Mesh → Combine. You can group the pieces by selecting them and going to Edit → Group (⎈ Ctrl G).
It is up to you whether you would like to group or combine the different parts of your toilet, it usually depends on how you will be shading the object later on. For example, it’s common practice to combine all the parts of a model that will be shaded with the same material later, and then group everything at the end. However, since you are most likely not using this asset for your short (unless you are in which case congrats you got a head start on your group work!!) we’ll leave the decision to you.
Second, make sure your outliner is organized and everything is clearly named!! This will become super important when you start modeling assets for your shorts.
Third, make sure you center pivot, delete history, and freeze transformations on your toilet. The shortcuts to each of these actions can be found on the shelf:

Fourth: SAVE YOUR TOILET IF YOU HAVE NOT ALREADY! (save your file as often as you can)
At last we have our final, beautiful toilet! However, notice that it’s missing some of the details a real toilet would have (like a flusher or hinges or bowl internals or a base). Feel free to be creative at this point; add any more details that you would like to experiment with. For the purposes of this lab, however, we only expect the basic toilet shape like in the picture below:
